
Loading
 One the the many benefits of making your own meat stocks is all the wonderful fat rendered during the process. A lot of people make the mistake of discarding the fat, thinking that it is unhealthy and that there is no use for it anyway. This is a big mistake. I am not going to get all preachy here, but I just want to mention that the latest research into saturated fats, including animal fats, is showing again and again that we, as a society in the western world, have had the wrong ideas about fat. This, some speculate, may even help explain the growing obesity problems in the world. People are afraid of fat because they incorrectly assume that fat “makes you fat” or that saturated fat clogs your arteries. The truth, it seems, is that saturated fats are not the enemy. In fact eating saturated fats seems to help maintain good cholesterol counts if consumed as a part of a healthy diet, especially if that diet is not high in sugar and other carbohydrates. Okay, I am not going to go into any more detail on that subject right now, because this is a “how to” post, not a diet advice post. I just really wanted to say these things because I think that animal fat is so important not only for health, but in cooking in general. It is the best thing for sauteing anything. If you have enough, you can also use it to deep fry, and you will have the best results you have ever had. Just make some eggs with rendered fat and you will wonder how you ever did without. Also, if you use cast iron skillets, nothing seasons them better. Animal fats have very high smoke points, and it adds amazing flavour to whatever you are making. I used to use olive oil for most of my sauteing. No more. Now it is usually either rendered animal fat, coconut oil, or butter.
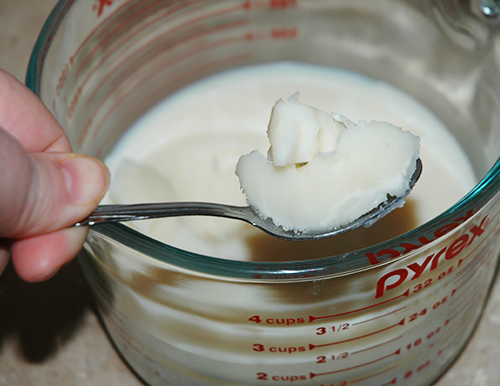
Beef tallow, chicken and turkey schmaltz, and lard, are some of the most common rendered fats that Americans will work with, but you can make stock and rendered fat out of pretty much any kind of meat (and bones). No matter what you are using, the process is more or less the same. If desired, roast the bones or carcass, or otherwise put the raw bones, carcass, and optional meat into a stock pot, add aromatic vegetables, if desired, simmer for anywhere from 6 to 24 hours, strain the stock, and let it cool. Here you will find all of my stock recipes and you can check those out if you would like more detailed instructions. Once you have completed these steps, you can go onto to the following steps to clean that fat and prepare it for use.
Saturday
Sep 14, 2013
 I rarely buy chicken pieces separately. I do sometimes, like when I just want many of the same cut, like 20 chicken wings for example, and do not want to buy ten whole birds to obtain them. Typically, though, I get a couple of whole chickens each month, and cut them up myself. I remember a time when it seemed like it would be impossible to get all those nice neat cuts out of a whole chicken, but I was wrong. It only takes a couple of minutes, and it is usually cheaper than buying the parts separately, plus you get the carcass which you can use to make stock! I always cut my chicken in such a way as to create boneless breasts. Many videos I see online show people cutting the breast plate in half and leaving it attached to the breast. I suppose this can be desirable for certain uses, but I find boneless chicken breasts far more desirable. Think about it. When you buy chicken breasts, do you look for boneless breasts, or breasts with a bunch of bones and cartilage attached? I have attempted to make this guide clear enough for anyone to understand, so if this is your first time I hope that it is helpful to you.
Monday
Nov 5, 2012

Chocolate covered walnuts
Have you ever tried to coat something in chocolate, like strawberries, nuts, bananas, homemade truffles, etc. only to find that what looked pretty and shiny directly after it was dipped, while the chocolate was still wet, ended up being rather dull and fragile once the chocolate had solidified? Speaking of solidifying, it probably seemed like that darn chocolate would never harden if you didn’t put it into the refrigerator or freezer didn’t it? Well the reason you had this trouble is because you did not temper the chocolate.
Tempering chocolate can seem like a complex and downright mysterious thing and for that reason most people tend to avoid the issue. Luckily, the truth is, tempering chocolate is not all that difficult in practice. It is simply a matter of heating the chocolate to a certain temperature, cooling it to a certain temperature, and then heating it again to a certain temperature. The scariest part of this process to most people is the precision required. How on Earth are you supposed to keep track of exact temperatures? How difficult is it to hit these temperatures without screwing it all up? This job does require one piece of special equipment. A thermometer. Once you have one, the tempering process really is quite easy. You do have to hit certain temperatures (usually give or take a degree) but this, you will find, is easier than you think. In fact if you temper chocolate a lot you can develop a feel for the the process and can even learn to do it without a thermometer. Until then though, go get a thermometer. Most people opt for a candy thermometer and this would be my suggestion as they would typically be pretty accurate, but I actually use a digital meat thermometer, which is not all that accurate, and I do just fine.
In this article I will describe the process of tempering, and explain why and how it works. While you don’t really need to know all of this information to successfully temper chocolate, this information will help you to understand why it is important and when something goes wrong, why it goes wrong. Do not let this information overload scare you. If you do not care to know all the technical mumbo jumbo about tempering you can just try following step by step instructions in a tempering recipe (like this one for dark chocolate covered blueberries).
Friday
Oct 12, 2012