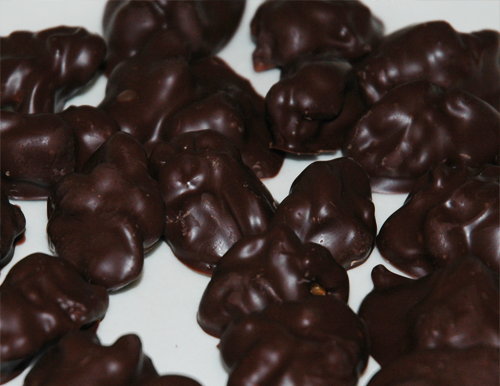
Have you ever tried to coat something in chocolate, like strawberries, nuts, bananas, homemade truffles, etc. only to find that what looked pretty and shiny directly after it was dipped, while the chocolate was still wet, ended up being rather dull and fragile once the chocolate had solidified? Speaking of solidifying, it probably seemed like that darn chocolate would never harden if you didn’t put it into the refrigerator or freezer didn’t it? Well the reason you had this trouble is because you did not temper the chocolate.
Tempering chocolate can seem like a complex and downright mysterious thing and for that reason most people tend to avoid the issue. Luckily, the truth is, tempering chocolate is not all that difficult in practice. It is simply a matter of heating the chocolate to a certain temperature, cooling it to a certain temperature, and then heating it again to a certain temperature. The scariest part of this process to most people is the precision required. How on Earth are you supposed to keep track of exact temperatures? How difficult is it to hit these temperatures without screwing it all up? This job does require one piece of special equipment. A thermometer. Once you have one, the tempering process really is quite easy. You do have to hit certain temperatures (usually give or take a degree) but this, you will find, is easier than you think. In fact if you temper chocolate a lot you can develop a feel for the the process and can even learn to do it without a thermometer. Until then though, go get a thermometer. Most people opt for a candy thermometer and this would be my suggestion as they would typically be pretty accurate, but I actually use a digital meat thermometer, which is not all that accurate, and I do just fine.
In this article I will describe the process of tempering, and explain why and how it works. While you don’t really need to know all of this information to successfully temper chocolate, this information will help you to understand why it is important and when something goes wrong, why it goes wrong. Do not let this information overload scare you. If you do not care to know all the technical mumbo jumbo about tempering you can just try following step by step instructions in a tempering recipe (like this one for dark chocolate covered blueberries).
What is the purpose of tempering?
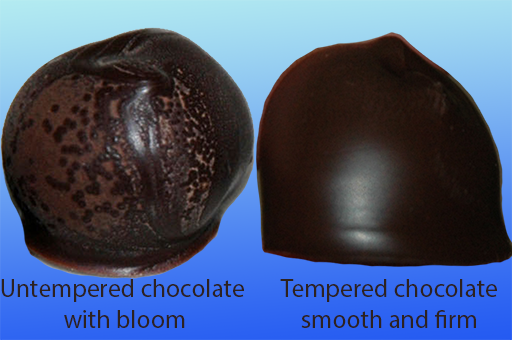
It all comes down to cocoa butter which is responsible for the structure and texture of chocolate. When chocolate is melted, all of the crystals responsible for its solidity are destroyed. This is, obviously, the reason why it becomes liquid. No crystals=no structure= liquid. It is just like water and ice. When ice crystals are heated beyond the molecules’ threshold to hold together, they melt. The ice loses its crystalline structure and becomes a liquid. When water is cooled down to a temperature where the water molecules can maintain a crystalline structure, the molecules organize themselves appropriately and create a strong network of ice crystals. Now, like cocoa butter, ice can exist in more than one crystalline structure, but unlike cocoa butter, all kinds of ice crystals are solid and sturdy and the different forms of crystals don’t seem to get in each others way like they do in cocoa butter. So, to answer the question, the purpose of tempering is to force the cocoa butter to crystallize in the most sturdy crystalline structure possible. When the correct crystal is achieved the chocolate has a smooth shiny appearance because the cocoa butter is distributed evenly throughout the chocolate. It does not melt at low temperatures and is strong and will, therefor, snap when broken. If the wrong kind of crystal is allowed to dominate the chocolate it will appear dull. It will be covered with a white chalky substance known as “bloom” which is just large patches of cocoa butter along the surface. It will melt at a low temperature and break easily. So the trick to tempering is avoiding these undesirable crystals from dominating your chocolate and allowing the desirable crystal to form their strong network.

Two chocolate covered blueberries of similar size. On the left is an untempered chocolate coating (caused by IV crystals) and is covered in bloom. On the right is a well tempered coating made of V crystals.
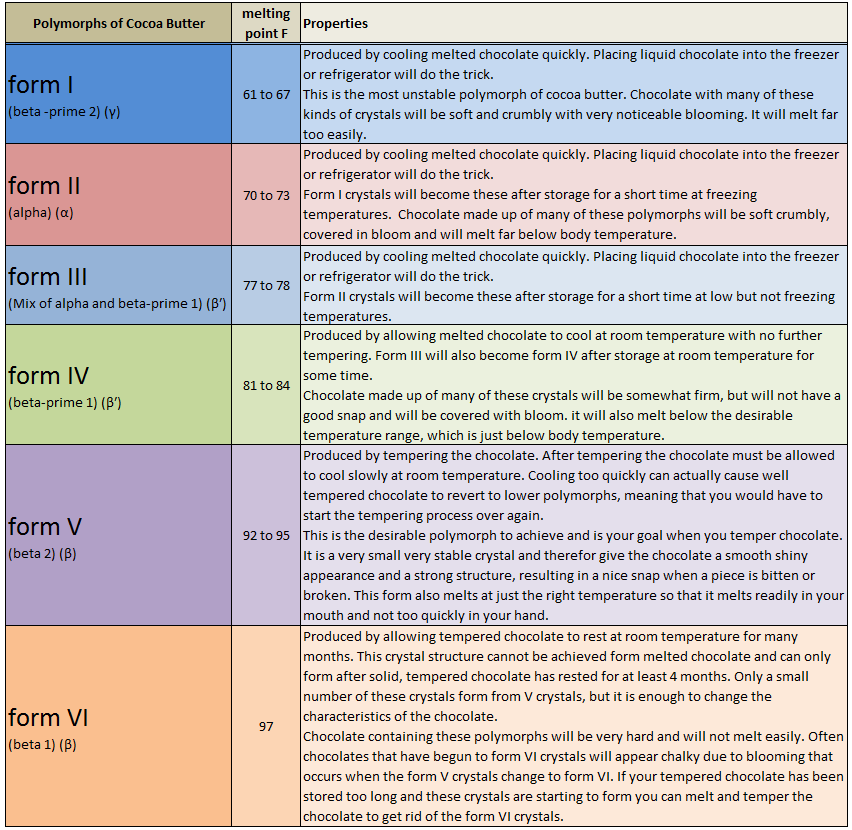
Now that you know that cocoa butter crystals are the key I will give you a brief description of each form. Cocoa butter can exist in six main polymorphs, or “crystalline structures” (really there are more, but these are the important ones). Each crystal has different properties. The following chart will acquaint you with the basics of each of these polymorphs.
As you can see it is form V that you are after when tempering.
So how exactly is tempering done?
The basic operation goes as follows:
Step 1: Heat the chocolate to destroy all crystals. (melt it)
Step 2: Cool just enough to allow V crystals to regenerate. Unfortunately, the temperature where V crystals start to form is also the temperature where IV crystals start to form. So…
Step 3: Warm the chocolate again, but only slightly. Just enough to kill off the IV crystal seeds that began to form but not enough to kill off the V crystal seeds.
That is it! Once you have done those three things you can use the chocolate to coat things or put it into molds. You simply have to keep the chocolate at this third temperature until you are finished using it. At that point just let it cool naturally at room temperature and as it does, those V crystal seeds will lock all the other molecules into place and they will all line up like little soldiers in V form.
Obviously I have not yet given you enough information. You need to know what temperatures you have to aim for and how exactly to do it all. So now that I have shown you that it is a simple three step process I will explain everything in more detail.
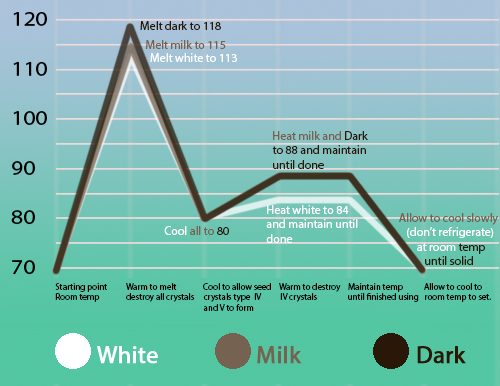
Before you do anything you need to take note of the kind of chocolate you are working with. Each type of chocolate must be taken through a slightly different temperature curve. The reason for this is that the different ingredients present in each chocolate react with the cocoa butter and change the melting temperature slightly. Besides this one detail, no matter what kind of chocolate you are using, everything else about the process is identical. The chart below illustrates the correct temperature curve for each kind of chocolate.
Please keep in mind that these temperatures are give or take a degree or two. Always aim for these temperatures and you should be good, even if you fudge it by a degree or so.
Step 1. The melting process
This can be done in various ways. You can heat it in very short bursts in the microwave, at a low temperature in the oven or over some kind of indirect heat, like a double boiler. The most important things to keep in mind are to raise the temperature gradually and absolutely under no circumstances take the temperature over 120 degrees, no matter what kind of chocolate you are using! Just about anything that can go wrong with this process is fixable except for two things, both of which can happen during the melting process. These are burning the cocoa butter, and seizing it by introducing any minute amount of water (which can happen if you are not careful with a double boiler). If cocoa butter is heated a little beyond 120 degrees the molecular structure will change so much that the molecules will never re-find their original crystalline potential again. Sometimes when it is overheated the cocoa butter will separate from the cocoa powder and you will be left with a grainy mess. Whether it separates or not, if heated beyond 120, you probably will have to start over with fresh chocolate. For this reason some people aim to melt their chocolate at the lowest temperature possible. It may take more time but all of the chocolate types can be melted eventually at around 110 degrees. It is unnecessary to be quite that careful though. Just aim for the melting temperatures on the chart and you should do fine. The heating method I prefer is the double boiler method because it allows you to monitor the temperature during each moment of heating.
If you do not have a double boiler (I don’t) you can make one by simmering water in a pot and placing a stainless steel bowl or smaller pot, into which you will put the chocolate, over it. When setting this up just ensure that the water does not touch the smaller vessel. You want the indirect heat from the gently simmering water to gently heat the chocolate. You do not want to dip the vessel holding the chocolate directly into hot water because it will heat it too quickly and probably too much before you can save it.
Another thing to note about the melting process, and the whole process in fact, is that the more chocolate you work with (within reason) the easier it is to control the temperature. I recommend, if possible, for you to work with around a pound or two of chocolate. You can of course work with less. You’ll just have to be very careful. One of the reasons why working with a larger quantity of chocolate is easier is because temperature changes will happen more slowly. Another reason is because to ensure you are getting as accurate a temperature reading as possible while working your chocolate, you want to keep the tip of the thermometer suspended within the chocolate, meaning not resting on the bottom of the vessel. So the deeper the pool of chocolate you are working with the easier it will be to keep the thermometer somewhere near the middle.
If the chocolate you are using is not in small pieces like chips or chunks be sure to break it up into small pieces before beginning. The smaller the better. You should constantly stir and agitate the chocolate as it warms and constantly monitor the temperature. Keep in mind that chocolate warms pretty quickly and cools slowly, so it is important to keep the heating gentle and slow to maintain control. Keep a bowl of ice water next to you so that if the chocolate begins to warm too quickly you can take it off the double boiler and place the bowl onto the cold water to prevent it from overheating.
Once you achieve the goal temperature (113 for white chocolate, 115 for milk chocolate, and 118 for dark chocolate)all of the chocolate should be melted. If there are still pieces of chocolate left to melt try to maintain the melt temperature by move the bowl on and off of the heat as necessary and keep stirring until it is all melted. Allowing the temperature to drop and rise a degree or two is ok. It is a balancing act. When all of the chocolate is melted you are ready to move onto step 2.
Step 2. The cooling process
Ideally you will cool the chocolate slowly. A common technique is to pour the chocolate out onto a clean marble slab and agitate it with scrapers until it thickens, indicating that it has reached the correct temperature of about 80 degrees (for all chocolate types). This process takes around 2 to 5 minutes typically. While very effective and the preferred technique for most chocolatiers, most people do not posses a large marble slab nor the familiarity with the properties of sufficiently cooled chocolate for the method to work.
Another option is to simply stir it in the same bowl you heated it in until it cools. The cooling can be helped along by dipping the bowl into the ice water here and there but this is optional. It will cool the chocolate a bit faster, which is ok, but remember not to cool it too quickly. Let it take at least two to three minutes to come down to 80 degrees. Also, as with heating with the double boiler, if you are using an ice water bath to speed cooling be sure not to introduce any water at all to the molten chocolate. It will destroy the structure of the cocoa butter and it will never temper.
An alternative approach to speeding the cooling process a bit is to add some solid chocolate shavings or small chunks into the melted chocolate. This will not only help to gently cool the melted chocolate but has the added benefit of introducing strong V crystals into the melted chocolate, thus “seeding” it artificially instead of forcing it to form its own V crystal seeds. This is the method that I find most appealing, but any of these will work.
During this cooling process remember to keep the tip of the thermometer suspended in the middle of the chocolate for the most accurate reading, and keep the chocolate moving to ensure that the whole batch is a uniform temperature.
When the chocolate reaches 80 degrees it will be slightly thicker because it is forming tiny crystal “seeds” of both IV and V form. Now that you have these seeds you simply have to heat the chocolate enough to destroy the IV seeds while keeping the temperature low enough not to destroy the V seeds. Onto step 3!
Step 3. Reheating to working temperature
All that is left now is to raise the temperature very slightly. For this I recommend going back to the double boiler. Keep the double boiler at a very low heat. You only have to raise the temperature a few degrees (84 for white chocolate and 88 for milk or dark) and absolutely no more. Now, if you do go higher than the goal temperature by more than a degree or two, your temper is ruined. Not a very big problem. Since it is not scorched, it is only re-melted, you are basically back to step 1. All you have to do if you go over temperature is bring the heat back down to 80 degrees again and proceed once again to step 3. Once you get the chocolate to the desired temperature, the trick is to keep it there until you are finished using it. Keep the bowl or pot of chocolate over the warm water in the double boiler with the heat on very low. Monitor the temperature carefully the entire time you are working and only allow the temperature to fluctuate within one degree up or down. Again, if the temperature strays too far up the temper will be lost and you must retemper again. If it goes too far below 88 (84 for white) degrees, the temper isn’t necessarily lost, but the chocolate will be too thick to work with.
Working with your tempered chocolate
Besides keeping the chocolate at working temperature there are a few more tips that I would like to share.
So you have gone through the steps, you hit all the correct temperatures and seem to have done everything correctly. How can you tell if you have, indeed been successful in your tempering venture? The fastest test is to smear a thin layer of the chocolate onto a piece of parchment paper or aluminum foil. Wait about three minutes. If by that time the chocolate is solid, shiny and breaks with a snap, you know that you have successfully tempered the chocolate and you can now use it with confidence. If it is not properly tempered it will remain liquid well beyond 5 minutes at room temperature.
If you are dipping items like fruit into the bowl of chocolate make absolutely sure that the fruit is completely dry. Remember that the tiniest bit of water can destroy a large batch of chocolate.
Allow your chocolate creations to cool at room temperature. Do not place into the refrigerator or freezer or the wrong kinds of crystals might form despite the fact that it has been tempered. You will find that well tempered chocolate solidifies rather quickly anyway, thus speeding the process along by chilling is unnecessary.
There is a lot more to know about the technical aspects of chocolate and the process of tempering, and some of the things that I have explained here are greatly simplified, but this is a good foundation for you to start your journey into the world of chocolatiering. Armed with the knowledge that you now have your next batch of chocolate covered “whatever”, or molded chocolate candies will turn out beautiful and will be sure to impress.


Pingback: Dark Chocolate Covered Blueberries | The Cooking Geek()
Pingback: Two weeks of Chocolate | food, life etc()
Pingback: The Many Uses of Chocolate – In Temper()
Pingback: Chocolate | jterlisnerblog()