There are a few choices when it comes to what kind of yeast home bakers have available to them. I only have experience with two kinds, instant yeast and active dry yeast. These are the most common yeasts called for in home baking recipes. When first learning how to bake bread I would follow each recipe to the letter. Since some recipes call for active dry yeast and others for instant, I simply made sure I had both on hand. This works, but it is a little inconvenient. Really, yeast is yeast. Which ever form you choose to use, it is the same organism and it will do the same thing to your dough. No matter what kind of yeast a recipe calls for, if you know how to substitute for your favourite kind, then you can confidently alter bread recipes.
So, What is the difference between different kinds of yeasts? Why choose one over the other? It is a matter of feel, ease of use, storage, and cost. Remember, no matter what kind you use you can get the same results as though you used another kind of yeast, but the way you use it will vary. Therefor I recommend trying a few different kinds until you find the one that suites your style best. Then you can learn how to substitute your type of yeast in recipes that call for another kind.
This is definitely not an exhaustive list, but here are a few common types of yeast that you may see in the grocery store.
Cake Yeast – This is the traditional fresh yeast known to home bakers from decades past. It is still widely available and is often used commercially, but sometimes harder to find than dry yeasts. It has a short shelf life, but can be frozen for a few months to keep it fresh a little longer. It is not called for in most home baking recipes these days, as other kinds of yeast are easier to use (I know, that is a subjective) and store better. Some people dissolve it in water before adding to the other dough ingredients, while others say it works just as well simply by crumbling it into the flour. I have never used this yeast myself.
Active Dry Yeast – This is the traditional dry yeast. It is sold in packets or jars and consists of small pellets that contain dried hibernating yeast. In order to use this yeast in a dough recipe, it must be activated by dissolving it in warm water (approximately 105 to 115 degrees F) usually with a little bit of sugar, to feed it. It is then allowed to “proof” for a few minutes until the water becomes foamy. This is when you will know that the yeast is alive and active. This form of yeast stays fresh for many months in the refrigerator and around a year and sometimes more, in the freezer.
Wednesday
Apr 27, 2011
When it comes to measuring flour there really is not one correct way. You will generally want to use the technique the recipe creator used at least until you get a feel for a recipe. I usually do not weigh my flour but I do when that is how the recipe calls for the flour to be measured. Weighing flour is definitely the most accurate way to measure it but I find that many home cooks do not have a scale. I also feel it is easy enough to measure flour pretty consistently without one, it just requires a couple very simple precautions. Consistency is the important thing here. When using my recipes, unless stated otherwise, this is the technique that I will have used and therefor is the technique that is best to use, at least for the first time or so, until you can convert the measurement into your own preferred method.
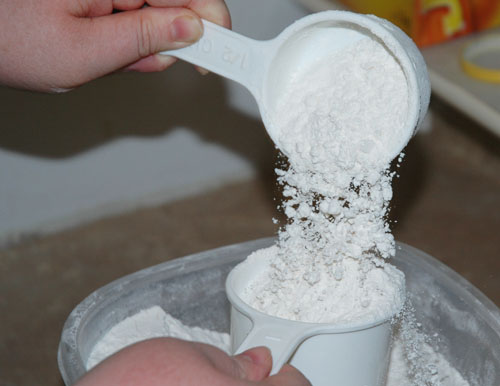
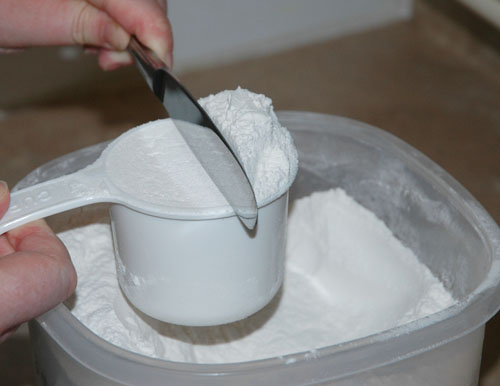
It is really quite simple. Flour packs very easily so if you simply scoop a measuring cup into the flour and lift it out you will have compacted the flour so much that you may have as much as 25% to 40% more flour than the recipe will have called for. This is why many recipes will call for the flour to be sifted into the measuring cup, so that it falls in loosely and lightly. That is the important thing, to fill the cup as gently as possible to avoid compaction. You may use a sifter and it  will work for my recipes but I take a simpler approach. Simply use a spoon or another measuring cup, scoop out some flour, and gently sprinkle it into the measuring cup that you actually intend to use to measure the flour. Overflow the measuring cup just a little over the rim (not too much or the weight of all that extra flour will compact the flour inside the cup). Immediatly, using a straight edge like the back of a knife level off the measuring cup. Do this right away because leaving the flour in the measuring cup with the extra flour on top will cause it to settle and compress after only a few seconds. Using this simple method will ensure that you do not over measure your flour when using my recipes. Remember, however, that not all recipes requiring flour must be measured exactly. I will mention when it is necessary to be exact with your measurements or not.
Thursday
Mar 17, 2011
It doesn’t matter how many years you have been a successful chef or what famous culinary school you went to, whatever you think the important differences between stock and broth are, there will surely be others with similarly impressive credentials as you, who have different opinions.
There is a difference, but I think it’s more of a spectrum than a black or white issue. Some say that stocks are merely simmered bones with no seasoning, vegetables or other ingredients involved, while broth is boiled meat with vegetables and sometimes spices and seasoning added to the mix. Others say that both broth and stock can contain bones as well as meat, but the important difference is the ratio of meat to bone, whereas a stock would contain more bone and visa versa. Another opinion is that broths are merely flavoured stocks. Still others say broth is stock that is being used in a soup. Salt content is sometimes described as being the critical difference as well. Sifting through the intricacies of the arguments can become quite tedious.
If forced to ultimately distinguish between the two I would say that they are the same, save that stocks are made with bones and broths are made with meat. Stocks are thick and gelatinous like jello when cooled because of the collagen that is extracted from the bones and connective tissues while simmering. The gelatinous quality of stock makes it better than broth for deglazing pans and is often used in place of butter or cream to make sauces in this way. Pure broth will stay liquid when cooled and will not taste quite as rich as a stock. This can be a desirable quality for light soups and other recipes that require a lighter flavour. It seems that many people feel that stocks should not include vegetables, but I don’t see any reason why they should not. I feel that if the dish you are preparing cannot do with the subtle flavours that vegetable add to a stock than one can merely make a stock without vegetables. To this Ill add that while vegetables seem to usually be required for a broth, there is no law against making a simple broth with only meat. When I make chicken broth I usually use bones and meat and the result is gelatinous when refrigerated, so I suppose that could be considered a stock, but I also put vegetables into it and use it as a base for soups, sometimes with water added to thin it if it is meant to be a light soup. The important thing, I think, is to use what is best for the recipe and call it what you like, whether it falls directly into the pure definition of the word or not.
To summarize, in my non-expert opinion stock and broth can be considered the same thing. You may choose to make a gelatinous broth by using bones or meat and bone combination or you can use only meat for a lighter result. Either way it will be delicious and will certainly out do anything you can buy at the store. You can detect the simplicity and taste the freshness in a homemade broth. I strongly urge you to try making it if you never have before. It takes time, but it is very little work. (recipe for chicken stock HERE)
Wednesday
Dec 15, 2010


